Wednesday, February 10, 2016

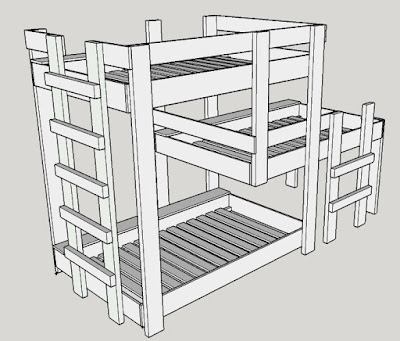
Triple Decker Bunk Bed

UPDATE: Since a few people have requested it, I'm making the Sketchup file for the triple-decker bunk bed available for download here: 

https://drive.google.com/open?id=0B8NscLPKix29OTk1TnJhS0l4NHc

You'll need SketchUp to open it, and should be able to figure out the dimensions, etc. using that. If you have any questions, feel free to email me at n8harris at gmail dot com. The usual disclaimers apply; I make no guarantees or warranties about the beds, use at your own risk, etc.

A couple of year ago, a friend of ours who is one of three sisters mentioned that her father had built them a triple-decker bunk bed when they were kids.  Needless to say, I was intrigued.  Maybe I could design and build something like that for my family!
When I called my brother and sister, though, they didn't seem too jazzed about the idea.  "We have families, and live far away from you," they pointed out.  "Also, we're adults."

I hated to admit it, but they had a point.  The only option left was to see if my own daughters wanted a bunk bed.  Amazingly, they did.  It was time to get to work.

I designed the beds in SketchUp.  Ella would get the top bunk, Josie the middle, and Ruth the bottom when she's old enough to sleep in a big-girl bed.  Apart from the constraints of fitting these bunks into the length and height of the room, I also wanted to give the beds shelves, so that the girls could have books, a reading lamp, water cups, or whatever else they wanted.

First I built the beds themselves.  Most of the boards are 1x8s, with 2x6s cut to length as spaced support pieces inside the shelf compartment.  The slats are 1x4s, and the rails holding the slats are 2x4s ripped in half.  
For the shelf top itself, I glued and nailed on a 1x7, then routered it with a flush bit to get the fit right.  I followed that with a round-over bit to take off the sharp edges.

The upright pieces are 2x6s.  The side rails of the two ladders are 2x6s, with 2x4s for rungs.  To connect the upright pieces and the ladder to the beds, I used four 3/8" bolts at each connection point.  To make the holes line up, I made a pretty "OK" template, if I do say so myself:

Being made of pine, the template got a little loose toward the end as the drill bit widened out the holes, but it made it through.

Just to make sure everything fit together well, Erin and I assembled the beds in the barn one evening. 

Success!  We took it apart again and sanded and painted all the pieces in an ombre style, which is a term I was unfamiliar with before.

With some assistance from Erin's parents, we distracted the girls for long enough to reassemble the whole thing in the girls' room.  I added guard rails to the top two bunks, added more slats, and put 1/2" plywood down on top of the slats, since we used youth mattresses without a box spring.

 The girls love their new beds. Everyone's shelf is filling up with books, nightlights, class pictures, etc.


The design had a few tricks up its sleeve.  Though I didn't really think much about it while designing the bed, the side shelf and supports underneath it give the structure a lot of rigidity and stability.  Also, what I thought of as a dead space under Josie's bed was immediately transformed by the girls into a "book nook" complete with beanbag chairs and a basket full of books.

We've started tracking the girls' heights on one of the uprights.

There are a few minor design changes I would make if I had to do it again, but overall everyone is  very happy with how the bunks came out.
Sunday, November 15, 2015

Coop de Grace


Previous coop posts here and here.

We sided the coop with cedar shingles-- second quality, we're not made of money.  Erin and the girls have made a lot of decorations and finishing touches to the coop, including the "wall of names," where a medallion hangs with each chicken's name. To reflect the fleeting nature of mortality, they're written in chalk.

 Both in the coop and in the run, we have water buckets hanging with poultry nipples on the underside--they work kind of like those gerbil bottles.  Strangely, the chickens picked up on the concept within 5 minutes, even though it took them about three weeks to figure out how to use the ramp into the coop.


Inside the coop, we have some homemade PVC pipe feeders.  Getting the design right took a few tries, until we decided to use an end cap with a cross section cut off the top.


The chickens get in and out of the coop through a little sliding door into the run.  The door can be opened with a pullstring from outside the coop.


Rules matter.

Erin also made some curtains for the nesting boxes.

Rexie is the only hen laying so far, giving us about an egg a day.
With winter coming, I covered the screen windows with some plexiglass windows that can be easily removed in the spring.  We'll have to do some additional winterizing, and will provide some supplemental heat when the temperature drops really low.  But in general, our chickens are hardy breeds, so will be pretty comfortable in the coop through the winter.

I'll do a follow up post at some point during the winter with an update on how the birds are faring.  But we've all really enjoyed having the chickens so far!

 On to the next project.

Sunday, October 25, 2015

Coop: Doors and Windows

As any fool will tell you, a chicken coop needs doors and windows.  For the "front door" into the coop, I wanted to go for a barn door look.  I used some graph paper I found and whipped this up:

I'm sure by now you're thinking, "holy mackerel, this guy's a great pen-and-ink artist, too?"  But if you look closely, you can see a few mistakes.

Anyway, the first thing I did was lay out the 1x4s and swap them around to find a nice fit and face.  Then I marked the lines for the window, and made the cuts. 

Next, I rearranged the boards on top of the 1/2" piece of plywood I used for the back of the door.  With the window hole cut out of the top boards, I transferred it onto the plywood underneath, and cut the hole out of that.  Then I glued and clamped everything up.
 Next came the classic barn door trim pieces, and the hardware cloth covering the window.  The door is really heavy and solid, which lends a certain credibility to the coop, I think.
I also made a screen door into the run by making two identical frames of 1x4" and sandwiching a piece of hardware cloth between them. I got some classic strap hinges for the coop door, and a classy black handle and sliding bolt hardware.  Spring-loaded hinges aggressively pull the screen door closed.  Watch your heels!

In an attempt to give these birds some religion, we decided to incorporate a stained-glass window that Erin made at a class she took several years ago, as people in their twenties are prone to do.

To make a frame for the window, I cut a dado on the edge of a random piece of cedar I had laying around.  The window then fit into the dado running along the inside edge of the frame.

As I figured it, the board was just long enough for me to squeeze out the four sides of the frame.  No sooner had I figured that than I made the old "parallelogram cut" mistake I do at least once on every project that requires a frame of some sort.  Way to go, dummy!


As it turned out, I was able to squeeze four sides out of the board, stupid mistakes aside.  Up it went, right over the nesting boxes.

We also got the nesting box doors on, and mounted suitably-matching handles in the middle of them.


Wednesday, October 7, 2015

Coop: Nest-Shaped Box

Based on the width of the coop, we decided to have three nesting boxes.  The nesting boxes are where the chickens (hopefully) go to lay an egg, which they do roughly 30 hours or so once they reach maturity.  We have 8 chickens, so we figured three boxes would be enough, as they're not going to be laying all at once.  I've read that they will all line up to get into a single favorite box, so I'll be damned if I'm going to make a bunch of unpopular nesting boxes.

We made the doors of the nesting boxes to fit some antique metal ceiling panels Erin found on the Internet.
I had a pajama-clad helper for a few minutes.

 When the moment of truth came, I slid the nesting box unit into the side of the coop, and it fit perfectly, 1/16" on each side.  It was attached with long lag screws to accomodate the weight of some heavy hens.

 Meanwhile, Erin fit the coop floor by cutting notches for the 2x4s passing through it.

 We also put up the sheathing on the sides.  I could (should?) have used housewrap, but I had a bunch of tar paper left over from the roof of the woodshed, so I just used that. 
 Also, judging from this picture, I guess I put the roof on at some point?  It's clear corrugated plastic.


Saturday, October 3, 2015

Coop: Game of Chicken

Sometime within the past year or so, we started talking about the idea of getting some chickens.  Frankly, our cat was a huge disappointment in terms of being dynamic and self-starting, so we wanted to add something with a little more "strut and head-bob" to the operation.

It came about like most things around here do: I threw out the poorly-formed idea of getting chickens, and Erin researched, planned, and executed the idea.  Soon we were scheduled to pick up 8 newborn chicks on the last Friday in May.  Since that also happened to be my last day at my job, and I was taking two weeks off before starting my new job, it seemed like a good time to get started on building a chicken coop. Boy, I couldn't have been more wrong...

...because it was a great time to get started on building a chicken coop!  We got the chicks and boy were they cute.
We kept them in an unused bathtub in one of our bathrooms.  They required a heat lamp to keep them at 100 degrees F, which gave the added bonus of a nightmarish red pall cast over everything.  The chicks could be forgiven for thinking they were in hell!


Meanwhile, I began laying the foundation for the coop.  The first step was digging a ditch deep enough to put one of these 8"x16" red bricks on edge, then another flat on top of it, forming a T-shape.  This was to discourage predators from digging under the walls of the coop; what with the whole El Chapo thing this summer you can't be too careful.
 
Luckily, there were some really cool tree roots along the way to force us to slow down, take stock, and soak in the excavation experience.
The site we picked for the coop was on a slight rise.  The footprint of the coop is 12'x6', and across the 12' front there is probably about a 6" rise.  With a lot of leveling and crawling in the mud and cutting my hand on some mysterious glass in the ground--it seems we built the coop on an old ashtray landfill--I finally got the foundation nice and level.
For coop designs, I was definitely inspired by the Wichita Cabin Coop, and spent a long time studying the pictures posted by the builder of that coop.  But I also wanted to do a clear PVC roof kind of like this Taj Mahal design.  Doing the PVC roof requires purlins (roof pieces that run lengthwise), and my roof (and entire coop) ended up being different from either of the plans I looked at.

First up, the frame.
Though I'm referring to the whole monstrosity as a coop, there's essentially two parts: a screened-in outdoor "run," that the chickens can recreate in, and the raised, enclosed coop itself, where they will sleep and hide from foul weather.  I added short-length purlins and framed out the floor of the coop (seen here on the right).
My brother-in-law and father-in-law came to visit, and were kind enough to start hanging the screen (1/2" hardware wire) while I continued to frame the coop.


Hanging off the right of the coop would be the nesting boxes, where the chickens would go to lay their eggs, and where our hands would go to retrieve those eggs.  As you can see in the picture above, I made a rectangle, slightly raised off the floor of the coop, to act as a sleeve for the nesting boxes.  Then I could build the boxes at my leisure, in the comfort of my own barn, and slide them in to the coop like an air conditioner.  But that's a simile for next time!